
The interface
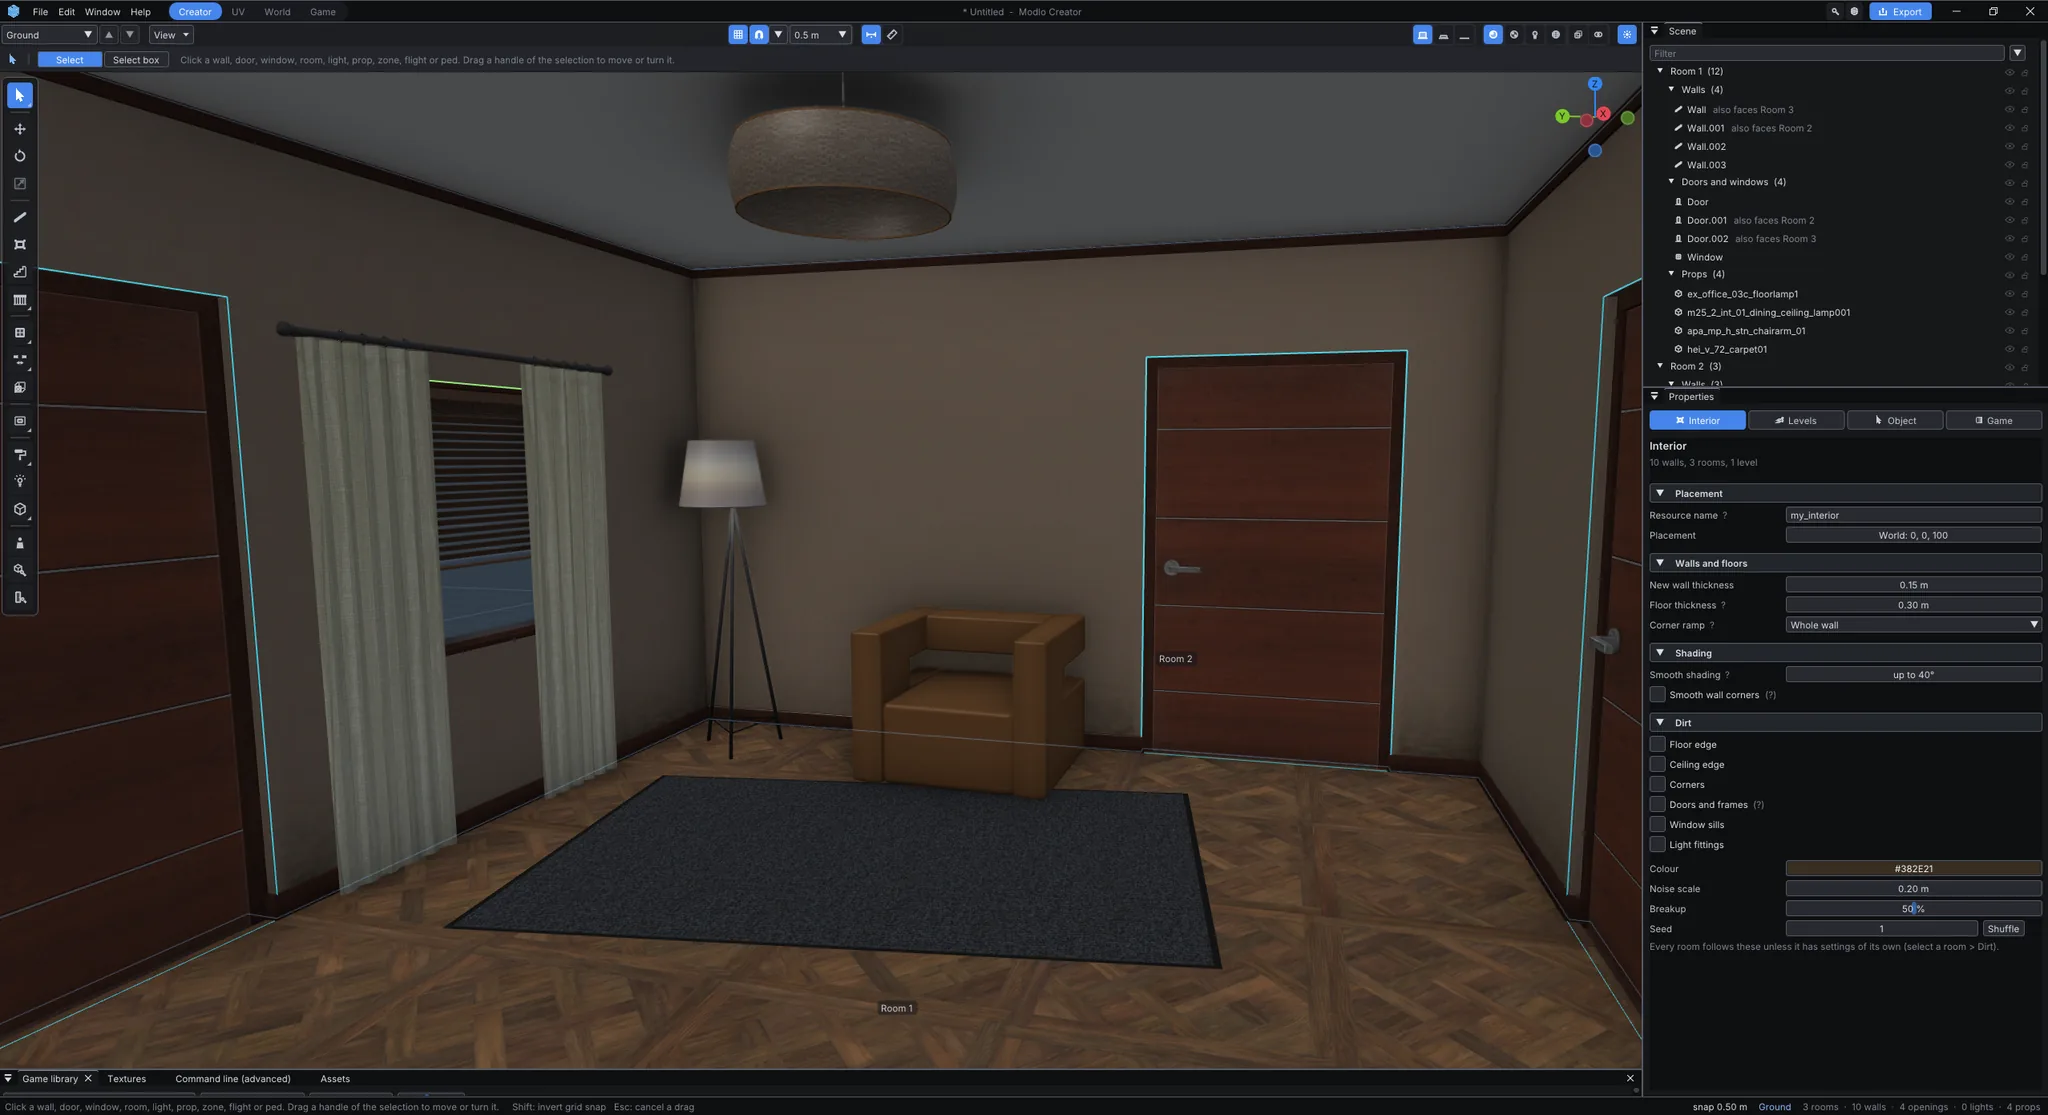
The four workspaces
Section titled “The four workspaces”The tabs in the menu bar (or Window > … workspace) switch between them.
| Workspace | What it is for |
|---|---|
| Creator | Build the interior: walls, rooms, openings, decoration, lights, props. You spend most of your time here. |
| UV | Edit the UV coordinates of a mesh object. See UV editing. |
| World | Where the interior stands: at a world position, inside a building of the map (walk-in) or behind a teleport. See Walk-in buildings. |
| Game | The interior as the game will see it: the vertex-colour bake, portals, room bounds and the exported shell. |
The panels
Section titled “The panels”- Tools: the column on the left of the view. Drag its right edge to make it wider, like Blender’s toolbar: one column, two columns, then one column with the tools’ names. Double-click the edge to go back to automatic. Hover a button to see its key.
- Scene (top right): every item by name, grouped by room, with hide and lock per item. F2 renames.
- Properties (right): the selected item’s settings in tabs. With nothing selected it shows the Interior settings and the Levels.
- Tool options: the strip over the view with the active tool’s choices, such as Full or Half walls, the door size or the light type.
- Bottom strip: tabs for Assets, the Command line, Problems, History, the Game library and Textures. Drag a tab out to float it, or the strip’s edge to make it taller. Window > Reset layout puts everything back.
- Command palette (F3): every command by name, including the Add menu entries. When you cannot remember where something is, search for it here.
Moving around the view
Section titled “Moving around the view”| Key | Action |
|---|---|
| Right mouse drag | Orbit |
| Middle mouse drag | Pan |
| Mouse wheel | Zoom toward the pointer |
| W A S D or the arrow keys | Glide the camera over the plan (hold; Shift is faster) |
| Q / E | Turn the view 45 degrees left / right |
| F | Frame the selection (everything when nothing is selected) |
| Shift+F or Home | Frame everything |
| 7 | Top view |
| 1 | Default 3D view |
| Page Up / Page Down | Go to the level above / below |
| Ctrl+Home / Ctrl+End | Walls up / down (press again for the cutaway view) |
The view header has the View menu, the shading modes (Solid, Material, Lit, Wireframe), X-ray and the Overlays popover (grid, axes, room names, light volumes, portals, measurements).
Number fields
Section titled “Number fields”Every value in the panels is a number field, as in Blender: a dark box with the value in the middle.
- Drag left or right anywhere in the box to change the value. Hold Shift for fine steps, Ctrl to snap to round values.
- Arrows: hover a field and a small arrow shows at each end; click one to step the value down or up by one unit of its last digit.
- Type: click without dragging (or double-click) to type a value. Enter confirms, Esc cancels.
- Sliders (opacity, percentages, factors) show a lighter bar up to the value. Dragging moves the value relative to where you pressed; it does not jump to the pointer.
- X / Y / Z: a vector is three joined fields; each one drags and types on its own.
Control schemes
Section titled “Control schemes”Modlo controls are the default and are what these docs show. A Blender scheme (middle-drag orbit, G / R / S transforms, X deletes, the numpad picks views) is one click away in Preferences > Controls (Ctrl+,), where every binding can also be changed and conflicts are shown. The in-app guide’s key chips always follow the scheme you use. Both schemes are listed on the Keyboard shortcuts page.
Screen size and UI scale
Section titled “Screen size and UI scale”The interface scales itself to your display. If you set a scale in Windows (or your Linux desktop), that scale is used; otherwise the editor goes by the screen’s resolution: 100 % up to 1080p, 125 % at 1440p, 150 % at 1600 to 1800 lines, 200 % at 4K and 250 % at 5K. Preferences > Interface > UI scale has the presets Auto, 1080p, 1440p, 4K and 5K, plus a Custom scale slider, and shows what Auto currently means on your screen. The choice applies at once and is kept for the next start.
Showing the keys you press
Section titled “Showing the keys you press”Recording a video or a tutorial? Window > Show the keys pressed (or Preferences > Interface) lists the keys and mouse buttons you press over the 3D view in its lower left corner, each with what it did (“Ctrl + Z Undo”, “Middle mouse Pan (drag)”, “Left mouse” with the tool’s name), like Blender’s Screencast Keys add-on. Pressing the same key again soon after counts up (“x3”), and Keys stay for sets how long a line stays. What you type into a field is never shown. It has no key by default; give it one on the Preferences > Controls page.
Help inside the app
Section titled “Help inside the app”- F1 opens Help > Documentation on the page for what you are doing now (the workspace, tool or selection).
- Shift+F1 opens the shortcut sheet in a window of its own.
- Problems (the counter in the status bar) lists what is wrong with the interior right now, with a reason for each.
- Window > History lists every undo step by name.