
6. A walk-in interior
A walk-in interior stands inside a building that is already in the map, and players enter through the building’s own doorway. Modlo Creator finds the building, shows it around your interior, and on export cuts the doorway through the building’s model and collision.
You will learn: picking a building by coordinates, the models a building comes with, lining the interior up with a doorway, marking and cutting openings, tracing walls or exploding them from the building, clear collision boxes, the game’s floor inside the rooms, occluders, and reading the self-check.
You need: the GTA V install, and the in-game coordinates of a spot inside the building you want (your admin menu can show them while you stand there).
1. Pick the building
Section titled “1. Pick the building”- Open the World workspace (the World tab in the menu bar) and choose Walk-in at the top of the World page in the Properties panel. Until a building is picked, the page is a search.
- Paste the coordinates of a spot inside the building, as the game shows them (
x, y, z), and press Find (or Enter). - The buildings of the map within 20 m of that point are listed (tick Small objects too to list props and small pieces as well). Click through the list: the selected one shows in the view as a ghost, with everything that comes with it, and the view turns to it.
- Press Build inside this building. The interior’s ground floor goes to the point, on the floor under it when the map has one there.
tut6-01-building-search.webpThe World page now has five tabs: Placement, Openings, Walls, Edit building and Map files. On the Placement tab, the View section sets how the building shows round your interior (Show building: Hidden, Ghost or Normal). Tick Show its collision to see the map’s collision as red edges: that is what players actually walk into.
The models the building comes with (its decals, detail meshes, emissive window glass, the props on it) are listed under Imported with the building. The tick in front of a row includes it or leaves it out; click the row itself to choose what happens to it under In the map:
- Included: drawn with the building, moves with it, cut by its openings, editable like the building itself;
- Left out: stays as the game has it;
- Removed: taken out of the map; the export writes the map file again without it.
Leave them as they are for now. See The models it comes with for when a removal is refused.
tut6-02-imported-with-building.webp2. Mark the front door
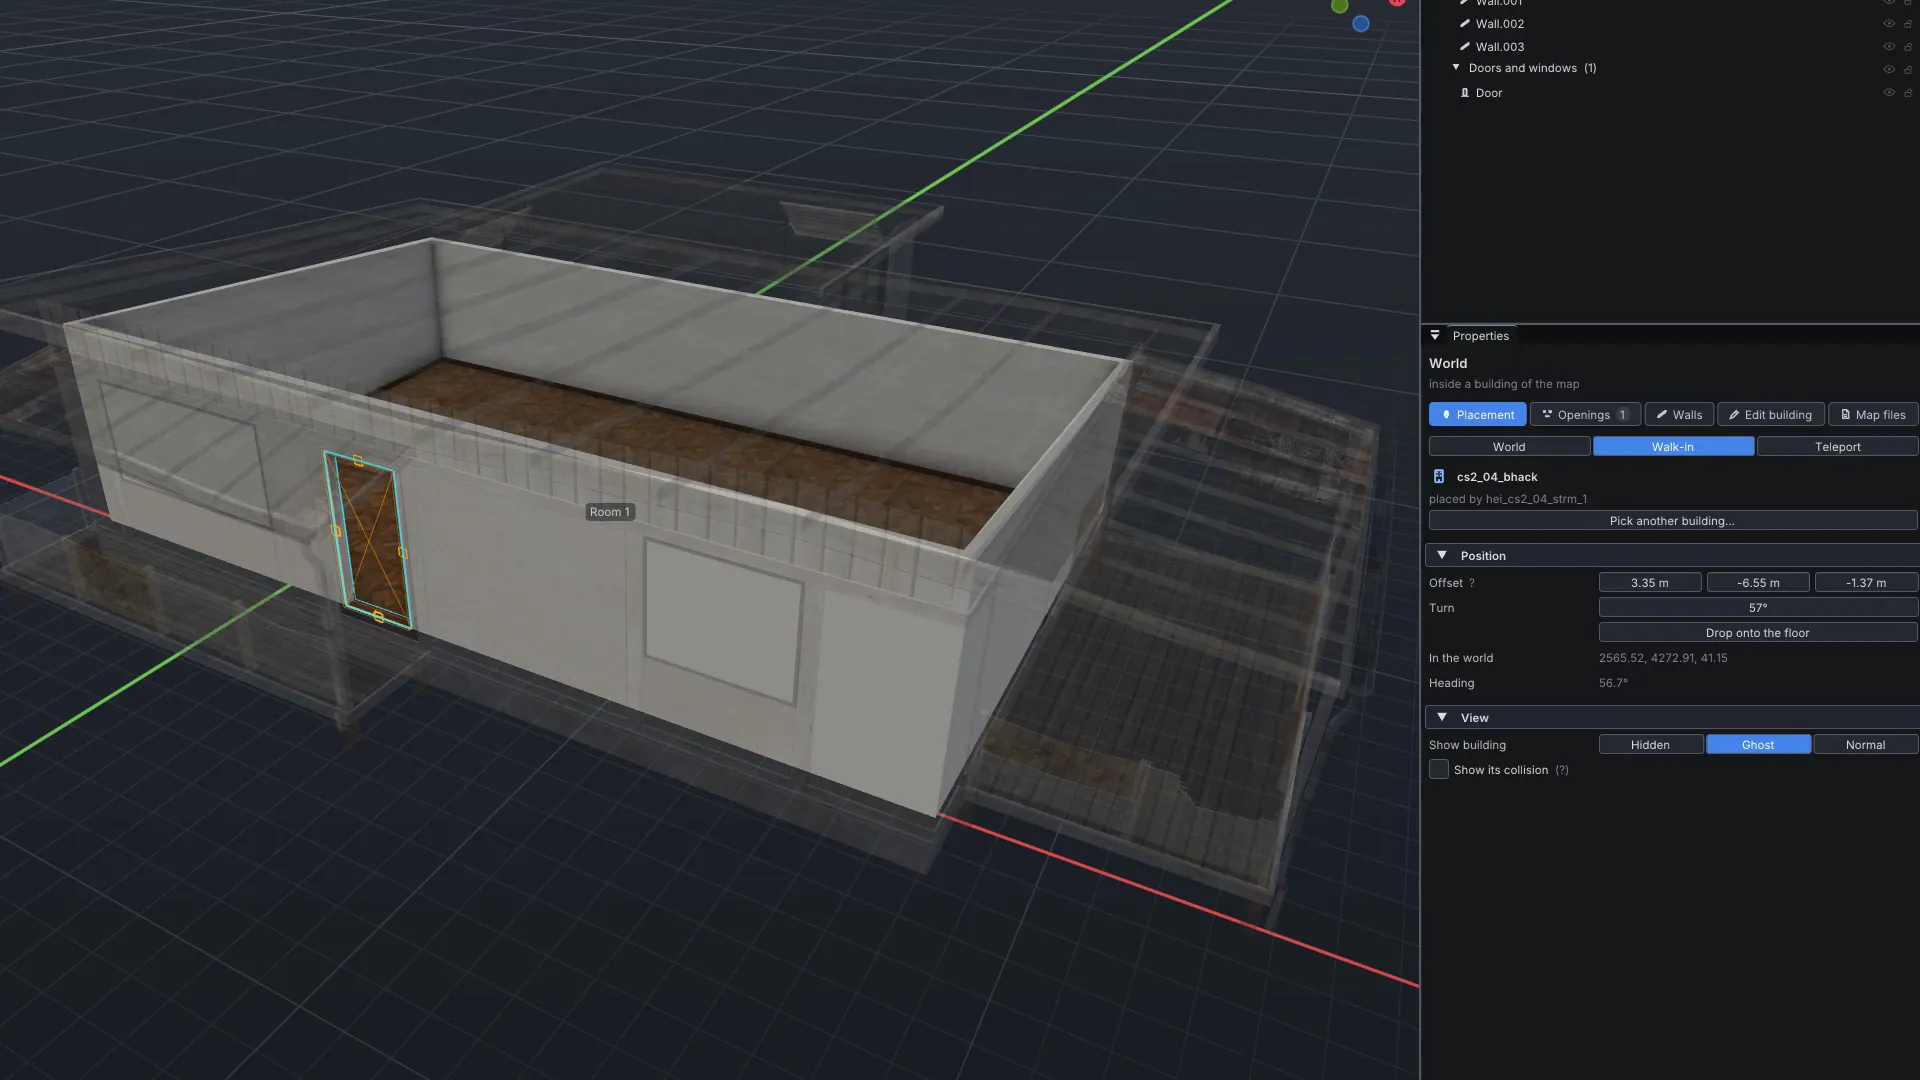
Section titled “2. Mark the front door”- Open the Openings tab and choose how to mark under Mark by:
- Drag (the default): drag a rectangle across the doorway on the wall. Corners snap to the model’s vertices within 10 cm, and sizes round to 5 cm. Alt frees it. A plain click detects a recess, as Detect does.
- Detect: click inside the doorway’s recess and it is found for you.
- Corners: click 2 or 4 corners (the Corners row under it picks 2 corners or 4 corners).
- Press Mark an opening and mark the doorway in the view. Esc stops.
- The mark appears under Marked openings (Opening 1) and is selected. A mark at least 1.7 m tall whose foot is on the floor starts as a Door; make sure its Type is Door: a door cuts the model and the collision (both Cut on export buttons lit); a window only the model.
- The cut’s reach was measured when you made the mark: a game wall can stand a metre behind the visible facade. If you change the mark, press Auto depth to measure it again.
With Keep marks upright on (the default), the mark stands straight and level even if the facade you click leans a little. A door’s cut leaves the ground, the step and the threshold it stands on, so nobody falls through the world in front of the door.
tut6-03-mark-door.webp3. Line the interior up
Section titled “3. Line the interior up”With the mark selected, press Line the interior up (under Use the opening in the mark’s panel; it needs a doorway at least 1.7 m tall). The interior turns and moves so this doorway’s wall runs along the grid, and a first room is added with the door exactly in the middle of its front wall. Its origin is the middle of the doorway’s foot, and the front wall’s outer face lies on the facade.
If your interior already had rooms, adjust it instead with Offset and Turn in the Position section of the Placement tab, and press Drop onto the floor to set its height from the building’s floor. A building made only to be seen from outside has no floor inside; Drop onto the floor then puts the ground floor at the bottom of its walls.
tut6-04-line-up.webp4. Walls that fit the building
Section titled “4. Walls that fit the building”You can draw the rest of the rooms by hand or let the building draw them.
Trace (quickest):
- On the Walls tab press Trace a room and click inside a room of the building. (Trace the whole level traces every closed room of the level at once.)
- A preview shows: a dashed outline with its wall count and area. Change Clearance, Furniture height or Simplify under Outline if it is not right; the preview follows at once.
- Press Accept (Enter) to add the walls in one undo step, or Cancel (Esc).
tut6-05-trace-preview.webpExplode points (when the trace gets a room wrong):
- Under Explode points press Place explode points and click inside the room. Each point casts rays all round and shows the walls it hits, with their corners and wall ends. Add a point or two until every wall has been seen.
- Press Place corners and click the room’s corners in order. They snap to the corners the rays found, even one hidden behind furniture. Backspace takes the last one back.
- Leave Square the walls on, so a slightly-off click never leaves a crooked wall, and Add doors and windows on.
- Press Build shell (Enter): the walls are drawn, with doors and windows where the building has openings.
tut6-06-explode-points.webpBy hand: with a walk-in building the Wall tool snaps to the building’s inner wall faces, so walls land parallel to them even when the building is off the grid. Untick Snap to the building (in the Wall tool’s options over the view, or on the Walls tab under When drawing walls), or hold Shift, to place freely.
tut6-07-wall-tool-snap.webpFit to the roof: tick it (next to Snap to the building) before you draw walls or build a shell, and each new full wall’s top follows the building’s roof or the floor above, so attics and sloped ceilings follow the building. For walls you already have (traced ones too), select them in the Creator workspace and press Fit to the roof in their Properties (Fit N walls to the roof with several selected); All walls of the level fits every wall of the level.
Rooms that reach outside the building are listed in Problems.
5. Openings from the marks
Section titled “5. Openings from the marks”Mark the building’s other doors and windows as in step 2. Then select them on the Openings tab (Select all, or Ctrl+click) and press Make openings (it shows once two or more marks are selected): a door or window is made in your interior’s wall along each mark, at the mark’s size and height, in one undo step. Marks that cannot get one (no wall along them, or the wall already has an opening there, like the front door from step 3) are listed with the reason.
tut6-08-make-openings.webpTo line up a door or window by hand, switch to the Creator workspace and drag or resize it along its wall: with snapping on, its edges lock onto the building’s opening. Or select it and press Match the building’s opening in its Properties to make it the mark’s size in one click.
6. Clear the game’s collision
Section titled “6. Clear the game’s collision”The game’s own collision often has walls or boxes exactly where your doorway is.
- Switch to the Creator workspace and select your front door. Its Properties open on the Object tab.
- Open the Game collision section and press Clear the game’s collision here.
- A clear collision box is placed through the wall and selected: the opening’s width plus 10 cm, the wall’s thickness plus 40 cm each side, up to just over the door’s head.
tut6-09-game-collision.webpOn export every collision surface of the game inside the box is removed. Keep the floor (on, in the box’s Properties under Cut) keeps the ground, so nobody falls through. With Show its collision on (Placement tab, View), the red collision lines in the view show the cut live while you move the box. The Clear collision box tool (Shift+O, or Place a box on the Openings tab) places a box by hand anywhere.
tut6-10-colcut-box.webp7. The game’s floor inside the rooms
Section titled “7. The game’s floor inside the rooms”Some buildings have the map’s ground or floor inside them, a little over your interior’s floor, and it would show through. Leave Floor > Clear the game’s floor inside the rooms on the Placement tab on (the default): the export takes the game’s flat surfaces around each room’s floor out of the building, the map models standing in it and the collision, inside your rooms and doorways only. Walls, pillars and furniture stay. The section names what it clears.
8. Map files: occluders and the game’s interior
Section titled “8. Map files: occluders and the game’s interior”Open the Map files tab.
- Occluders > Clear occluders over the openings (on): the game hides what lies behind occluders. This keeps the facade occluding round the door but not in it.
- Occluders > Clear inside: Rockstar puts box occluders inside solid buildings, which would make your interior invisible. Interior (the default) removes the ones that overlap your rooms; Building removes them for the whole building; Off leaves them.
- The game’s interior > Replace the game’s interior: if the game already has an interior in this building, tick it to write the map file without it. Its own doors and props go with it.
tut6-11-map-files.webp9. Export and read the self-check
Section titled “9. Export and read the self-check”Export as usual. The World page and the export look through every opening with rays against the files as they will be written and say if something still blocks it, for example:
hi@bh1_48_0.ybn still blocks the doorway 0.82 m behind the facade (12 of 63 rays): make the cut deeper (Auto depth)
A tick, a triangle or a cross next to each mark on the Openings tab shows the same, and Problems and the export report list it. Raise Cut depth or press Auto depth, add a clear collision box, and export again.
tut6-12-self-check.webpThe export writes the cut building and the changed map files under the game’s names in stream/, so the resource replaces them.
Next steps
Section titled “Next steps”- Walk-in buildings and Editing the building and map files in the user guide: every option of explode points, editing the building’s own mesh, window prefabs.